

LLM load testing ensures your AI applications can handle high traffic, deliver fast responses, and use resources efficiently by managing API access effectively. Unlike traditional systems, it measures performance in tokens per second (TPS) instead of requests per second. Key metrics include Time to First Token (TTFT), Inter-Token Latency (ITL), and error rates.
Key Takeaways:
-
Why It’s Important : Prevents slowdowns, ensures scalability, and optimizes expensive GPU usage.
-
Unique Challenges : LLMs handle inputs/output tokens differently, requiring specialized metrics like TTFT and ITL.
-
How to Test : Simulate realistic user behavior, track metrics, and use tools like Locust or Grafana k6.
-
Best Practices : Warm up the system, use Poisson arrival models, and avoid artificial spikes.
-
Improvement Tips : Reduce token output, implement caching, and enable streaming for faster perceived responses.
By understanding these principles, you can ensure your LLM-powered applications perform reliably under varying loads, delivering consistent user satisfaction.
Setting Up Your Load Testing Environment
To ensure accurate results, your load testing environment should closely resemble production conditions. This involves setting up the right infrastructure, choosing appropriate tools, and crafting test scenarios that mimic how users interact with your system.
Creating Realistic Test Scenarios
The key to effective load testing is replicating real-world user behavior. Start by defining workload parameters like input/output patterns, content characteristics, and system prompts.
Choose between two load models based on your testing requirements:
-
Open-loop models , which simulate independent Poisson arrivals.
-
Closed-loop models , which maintain a fixed number of concurrent requests.
For reliable latency measurements, aim for at least 1,000 samples to measure P99 latency with a 10% margin of error at 95% confidence. For P99.9 latency, increase the sample size to 10,000.
If you’re conducting Retrieval-Augmented Generation (RAG) testing, measure prefix sharing to assess key-value (KV) caching efficiency. To eliminate cache influence and measure raw performance, include unique identifiers like UUIDs in test prompts so every request is treated as new.
To create realistic test cases, use anonymized production logs or public datasets like ShareGPT. Before recording metrics, always run a warm-up phase by processing at least 100 requests or generating 10,000 output tokens. This ensures the model is fully loaded into accelerator memory.
Once your scenarios are in place, you can move on to choosing the right tools for execution.
Selecting Load Testing Tools
With scenarios defined, select tools that simulate these conditions effectively. Three types of tools are essential: load generators, experiment runners, and evaluators.
-
Load Generators : Tools like Locust (great for Python-based, scalable testing), Grafana k6 (open-source and integrates with Grafana dashboards), and JMeter (popular for API testing but limited to 250 threads per engine instance on Azure Load Testing).
-
Evaluators : Use smaller language models (SLMs) like GLIDER for evaluation. With just 3.5 billion parameters, GLIDER offers a cost-effective way to interpret results compared to models with 70B+ parameters.
-
Prompt Engineering Tools : For collaborative prompt development, consider Latitude (https://latitude.so), an open-source platform tailored for production-grade LLM workflows.
These tools bridge the gap between scenario planning and practical testing, ensuring robust simulations of LLM workloads.
Preparing Your Infrastructure
Start with environment parity - deploy your application in a staging environment that mirrors production. Include all components like frontend, backend, networking, and databases. Run tests from the same region as your production environment to minimize latency variations from external networks.
“Performance testing is crucial and should start as early as possible during the development process. This early start provides enough time for making necessary adjustments and optimizations.” - Microsoft LLMOps Workshop
Provision compute resources based on expected throughput. For instance, LiteLLM showed that handling over 1,000 requests per second in 2024 required four replicas of a t2.large server (2 vCPUs, 8GB RAM) on x86 architecture, with Prometheus monitoring for success and failure rates. For RAG applications, include specialized tools like vector databases (e.g., Qdrant) in your setup.
Enable auto-scaling to handle fluctuating demand but be aware of its limits. Throughput tends to plateau - often around 8,000 tokens per second - once hardware is maxed out. At this point, additional requests only increase latency due to queuing. To manage rate-limit errors (HTTP 429), implement exponential backoff retry logic.
Use this formula to estimate throughput needs: (Total Users × % Active × Sessions per User × Interactions per Session) ÷ Peak Duration in Minutes. This will help you provision resources and set realistic testing goals.
Running LLM Load Tests
LLM Load Testing Key Metrics Comparison Chart
Once your test environment mirrors production, it’s time to run tests that provide actionable insights into your LLM application’s performance. The aim is to gather precise metrics that reflect how the system behaves under realistic conditions.
Best Practices for Load Testing
Start your tests with a ramp-up period of 20–60 seconds and include a warm-up phase involving at least 100 requests or 10,000 tokens. This gradual increase helps avoid artificial spikes that could distort your results.
“Slamming an LLM with maximum load immediately can cause waiting queues to spike and GPU cache to hit 100% instantly.”
- Christian Posta, Global Field CTO at solo.io
Gradually increase the load to pinpoint the exact thresholds where performance begins to degrade.
Use open-loop load generation, employing Poisson arrival distributions. This approach separates request arrival rates from response times, revealing how the system performs when pushed beyond its limits. Additionally, vary your test data to avoid caching effects that might skew results.
“LLMs use techniques like speculative decoding that rely on predicting token probabilities based on real-world language patterns. Random tokens disrupt these patterns, leading to inflated latency metrics and misleading results.”
- Christian Posta, Global Field CTO at solo.io
For realistic testing, rely on anonymized production logs or carefully curated datasets that reflect actual user interactions.
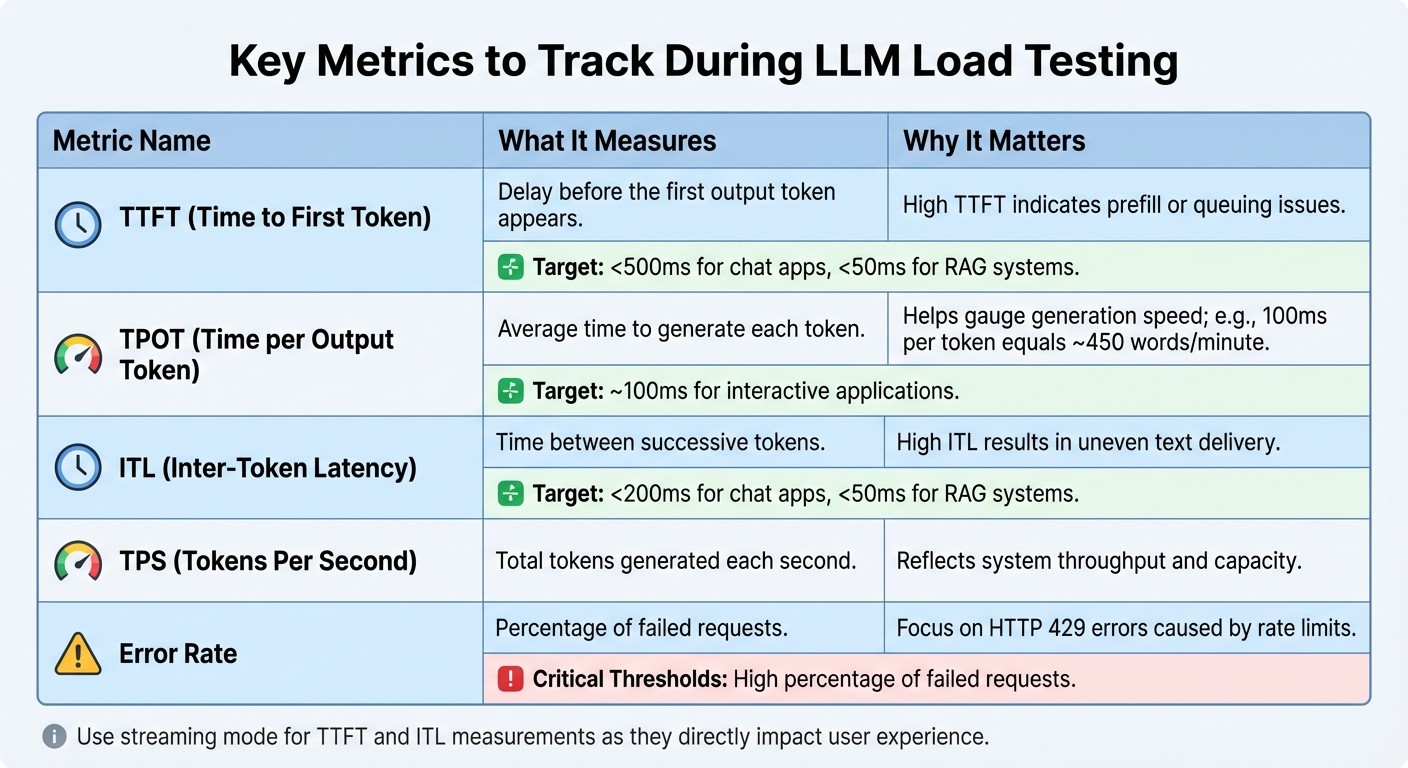
Tracking Key Metrics During Tests
Keep an eye on these metrics during your tests:
| Metric | What It Measures | Why It Matters |
|---|---|---|
| TTFT (Time to First Token) | Delay before the first output token appears | High TTFT indicates prefill or queuing issues |
| TPOT (Time per Output Token) | Average time to generate each token | Helps gauge generation speed; e.g., 100ms per token equals ~450 words/minute |
| ITL (Inter-Token Latency) | Time between successive tokens | High ITL results in uneven text delivery |
| TPS (Tokens Per Second) | Total tokens generated each second | Reflects system throughput and capacity |
| Error Rate | Percentage of failed requests | Focus on HTTP 429 errors caused by rate limits |
For metrics like TTFT and ITL, use streaming mode , as they more directly impact user experience than total response time. For chat applications, aim for a TTFT under 500ms and ITL below 200ms. Retrieval-Augmented Generation (RAG) systems demand even tighter thresholds: TTFT under 50ms and ITL under 50ms.
Monitor server-side metrics like GPU utilization, memory usage, and KV cache consumption to identify hardware bottlenecks. Be aware that throughput often maxes out - sometimes at around 8,000 tokens per second - once worker capacity is fully utilized.
Common Mistakes to Avoid
Understanding these metrics is key, but avoiding common mistakes is just as important. Errors during testing can lead to skewed results and misinformed decisions.
Skipping the warm-up phase results in inconsistent latency data because the system hasn’t reached a steady state. Using unrealistic prompts with random text disrupts speculative decoding patterns, which can inflate latency metrics and distort results. Ignoring rate limits means you’re testing the provider’s throttling mechanisms rather than your application’s actual capacity.
Even when using identical prompts, outputs can vary, which impacts throughput metrics. To keep things aligned, define Service Level Objectives (SLOs) with stakeholders before testing. This ensures your tests are tied to business goals.
Automate load tests in your CI/CD pipeline using tools like Pytest or Semaphore. This integration helps you catch performance issues immediately after code changes, preventing them from reaching production.
Analyzing Results and Improving Performance
Let’s delve into how to interpret load test results and take actionable steps to boost performance.
Reading Load Test Results
When analyzing load test data, look for the throughput plateau - this is where tokens per second stop increasing, but latency begins to climb. It’s a clear indicator that you’ve hit your system’s capacity limits.
To pinpoint specific issues, focus on key metrics:
-
TTFT (Time to First Token) : Helps identify prefill bottlenecks.
-
TPOT (Time per Output Token) : Highlights decoding delays.
For reliable P99 latency measurements, ensure you have at least 1,000 samples; for P99.9, aim for 10,000 samples.
Another critical metric is goodput , which measures the percentage of requests that meet Service Level Objectives (SLOs). Goodput bridges raw performance data with user satisfaction. Finally, identify the knee point , where P99 latency doubles the minimum latency - this marks your optimal operating limit. Recognizing these patterns and bottlenecks sets the stage for meaningful performance optimizations.
Improving LLM Performance
Reducing output tokens is one of the most effective ways to lower latency since response generation dominates overall processing time. Encourage your LLM to produce concise responses, which directly cuts down on TPOT-related delays.
Another game-changer is semantic caching , which reuses responses for similar queries. A great example of this is Microsoft’s Foundry team, which slashed response times from 19 seconds to just 1.3 seconds - a 14x improvement - by implementing this approach in May 2024. For workflows involving long system prompts or Retrieval-Augmented Generation (RAG), prefix caching can save time by avoiding redundant token computations across requests, reducing TTFT.
Enable streaming to enhance the user experience. While total response time remains the same, breaking responses into smaller, immediately available chunks makes the system feel faster. As Luca Stamatescu from Microsoft notes:
“Streaming improves the perceived latency of the application, by returning the response in chunks as soon as they are available”
Scaling Infrastructure for LLM Applications
After addressing performance bottlenecks, focus on scaling your infrastructure to handle higher throughput efficiently.
Continuous batching is a powerful method for managing bursty traffic. Unlike static batching, it allows new requests to join mid-inference, increasing efficiency and helping overcome capacity constraints. For interactive applications, aim for a TPOT of around 100ms per token, which is roughly equivalent to a reading speed of 450 words per minute - faster than most humans can read.
“Most production applications have a latency budget, and Databricks recommends you maximize throughput given that latency budget.”
- Databricks
Another advanced technique is speculative decoding , which uses a smaller draft model to propose tokens. If the main model accepts these tokens, it skips expensive computations, significantly reducing latency. For large models that exceed the memory of a single GPU, use tensor parallelism to split layers across devices or pipeline parallelism to stage execution. Lastly, co-locate your application backend and LLM endpoint in the same region to minimize network delays.
These strategies collectively ensure your system is optimized for both performance and scalability.
Conclusion
Summary of Best Practices
When it comes to LLM load testing, it’s all about keeping an eye on the right metrics: latency (TTFT and TPOT), throughput (tokens per second), memory usage , and reliability. The challenge lies in balancing concurrent requests with latency - pushing the system for higher throughput often leads to delays, so it’s about finding that sweet spot between speed and cost efficiency.
Your testing environment should reflect real-world conditions as closely as possible. That means accounting for realistic network latency, variable sequence lengths, and authentic user data to generate actionable insights. A brief warm-up period is also key to stabilizing performance before measurements begin. Additionally, open-loop testing with Poisson arrivals can uncover system behavior under extreme loads, as it separates request timing from response speed.
By following these practices, you’ll have a solid foundation for refining your LLM’s performance over time.
Next Steps for Ongoing Improvement
To maintain peak performance, load testing for LLMs needs to be an ongoing effort. Plan for quarterly re-benchmarking , or adjust the schedule if major updates from model providers are released. Use feature flags to roll out updates gradually, allowing you to validate performance under real-world conditions before scaling up traffic.
For teams looking to streamline collaboration between domain experts and engineers, tools like Latitude (https://latitude.so) offer a platform for shared prompt engineering and real-time performance monitoring. As César Miguelañez, CEO of Latitude, puts it:
“Benchmarking drives smarter deployment that reduces costs and enhances user experience”
Finally, continuous observability is crucial. This means actively monitoring for issues like hallucinations, performance drift, or unexpected cost spikes - problems that traditional testing might overlook. By embracing an iterative testing approach and maintaining vigilant monitoring, you’ll ensure your LLM applications remain dependable, scalable, and cost-efficient as they evolve.
FAQs
How do I set SLOs for my LLM app?
To establish Service Level Objectives (SLOs) for your LLM application, start by defining clear, measurable performance targets. Focus on key metrics such as latency , throughput , and error rates - these are crucial for evaluating your application’s performance. Identify the most critical aspects of your service, set realistic goals, and leverage tools like Latitude to monitor these metrics effectively. Make it a habit to review and adjust your SLOs regularly, ensuring they align with actual performance data and help maintain reliability over time.
When should I use open-loop vs closed-loop testing?
When assessing the performance of large language models (LLMs), two primary testing approaches come into play: open-loop and closed-loop testing. Each serves a distinct purpose depending on the stage of model development and deployment.
Open-loop testing measures a model’s performance in a controlled environment without incorporating feedback. This approach focuses on metrics like accuracy , latency , and response quality. It’s especially useful during the development or benchmarking phases , where the goal is to establish a baseline performance.
On the other hand, closed-loop testing involves integrating feedback into the process. By analyzing user interactions or specific goals, this method helps fine-tune the model over time. It’s a critical step during the production phase , ensuring the model adapts and improves in real-world applications.
In short, open-loop testing is best for setting performance benchmarks, while closed-loop testing is essential for refining and optimizing the model once it’s in use. Each method plays an important role in the lifecycle of an LLM.
How many samples do I need for P99 latency?
The sample size needed for P99 latency testing largely hinges on your specific workload and the desired confidence level. Typically, a sample size in the thousands is suggested to get an accurate measure of 99th percentile latency. Larger datasets not only improve the reliability of your results but also help achieve statistical significance.