

If you ship LLM features in hiring, healthcare, finance, ads, or moderation, you need automated bias checks in your pipeline. A one-time review is not enough, because model, prompt, and traffic changes can shift subgroup outcomes even when top-line accuracy stays flat.
I’d sum up the article like this: treat bias checks like uptime or error tracking. That means I would log the right trace data , test subgroup outcomes and counterfactual pairs , block releases when metrics cross set limits , watch canary and production traffic , and feed every incident back into evals and docs.
A few stats make the point fast:
-
A 2024 University of Washington study reviewed 3 million+ resume-to-job comparisons across 500 job listings and found white-associated names were selected 85% of the time, versus 9% for Black-associated names on matched resumes.
-
A 2025 review of medical LLM studies found 91.7% of studies (22 of 24) reported demographic bias.
-
Content filters can also skew by group, with false-positive increases of 0.45 to 0.49 for Black/African and Muslim identity signals.
If I were setting this up, I’d focus on five steps:
-
Define the failure types : text bias, decision bias, or both
-
Set pass/fail limits : like the 80% rule , subgroup rate gaps, TPR gaps, and calibration drift
-
Add tracing : log model version, prompt version, route, cohort tags, latency, tokens, and cost without raw PII
-
Run automated evals : use public benchmarks, custom prompts, and matched counterfactual pairs
-
Gate releases and monitor production : PR checks, canary comparisons, alerts, rollback steps, and incident records
One point I’d keep front and center: automation without clear thresholds just creates noise. If your team has not written down what counts as a failure, your dashboard cannot tell you whether to warn, block, or roll back.
Here’s the plain takeaway: measure bias on every change, compare results by subgroup, stop bad releases, and turn each incident into a permanent test.
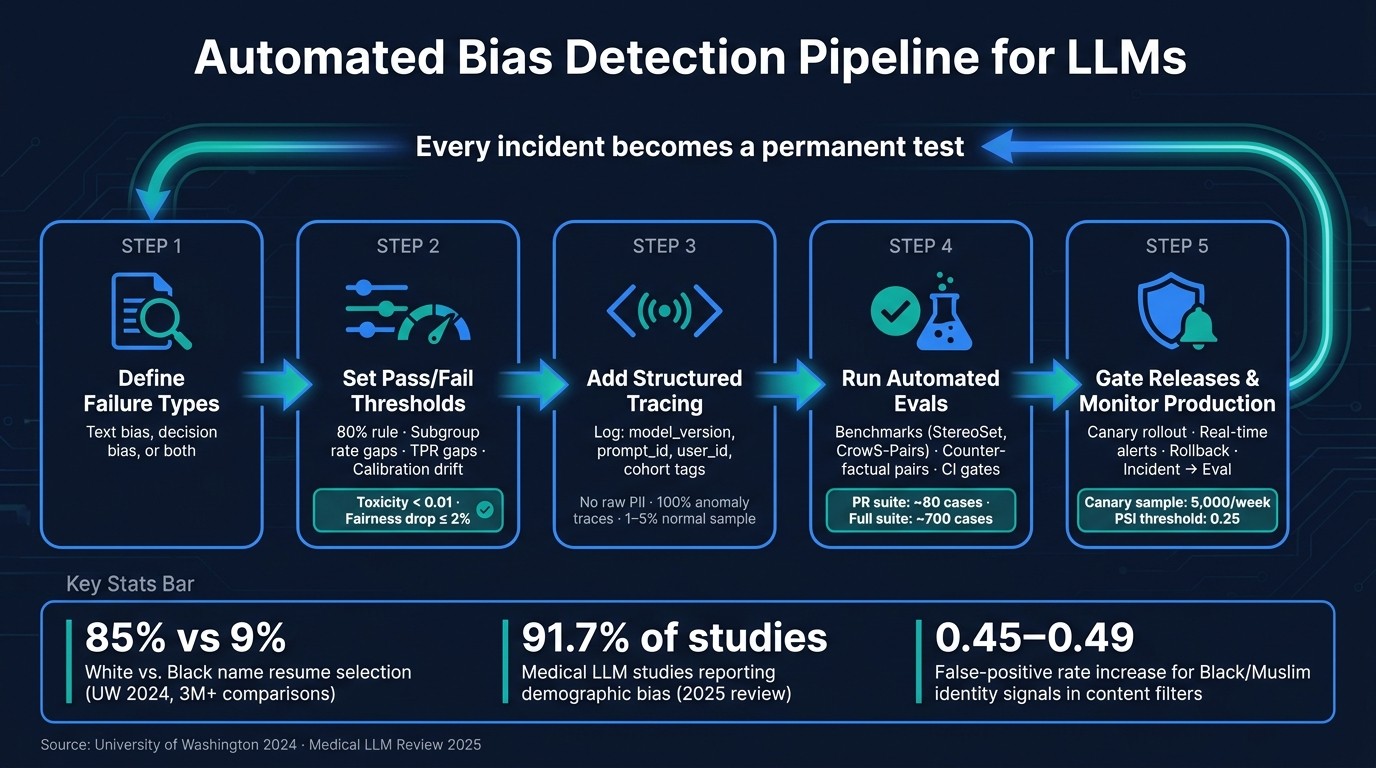
Automated Bias Detection Pipeline for LLMs: 5-Step Workflow
Instrument your pipeline so bias can be observed and grouped
Once your thresholds are set, add structured tracing around every LLM call so you can group outputs by cohort, model version, and route. If you skip that layer, top-line metrics can smooth over the exact gaps you’re trying to spot. These traces then feed subgroup evals, counterfactual tests, and release gates.
Log the fields needed for subgroup and root-cause analysis
Grouped metrics only work if every trace includes stable metadata. At a minimum, each span should carry model_version, prompt_id or prompt_version_id, feature_name, user_id, session_id, latency, token_usage, cost, and stable cohort tags like tenant_id or user_tier when they matter for your bias review. Those fields let you compare outcomes by prompt, model, route, and cohort.
Use prompt_version_id and feature_name to separate prompt-layer changes from model behavior.
Do not log raw PII in span attributes. Redact prompts before they reach your observability backend. Use stable, opaque identifiers - user_id, session_id, tenant_id, user_tier - so you can build cohorts without storing the sensitive data underneath.
Keep 100% of traces that trigger anomaly signals. For normal traffic, sample 1% to 5%.
Use observability platforms to surface bias failures from production traffic
Pick the observability layer that fits your stack and trace path.
Latitude is built to surface failure modes in production LLMs and track them like bugs. The big draw here is simple: it turns production issues into evals. So instead of hand-writing synthetic test cases, you can build evals from the traffic where bias already appeared. Its Python SDK uses an OpenTelemetry-based capture() method to attach user_id, session_id, and custom tags to each trace, which makes cohort filtering straightforward.
Langfuse supports nested tracing, prompt management, and human or LLM-as-judge scoring. Its @observe() decorator builds trace trees automatically. It’s open-source and self-hostable, which matters for teams with data residency needs.
LangSmith is a strong fit for LangChain and LangGraph stacks because setup is light and the native integration is tight.
Braintrust supports eval tracking, scoring pipelines, and dataset management. That makes it a good fit for teams that want to connect traces straight to structured eval workflows.
Helicone uses a proxy-based approach with zero SDK changes, so it’s a fast way to add basic logging and cost tracking to an existing pipeline.
| Platform | Best fit for bias work | Integration style |
|---|---|---|
| Latitude | Failure-mode surfacing and auto-generated evals from production issues | Python SDK (OpenTelemetry-based) |
| Langfuse | Nested tracing, prompt management, human/LLM-as-judge scoring | SDK / OTel / LangChain |
| LangSmith | LangChain/LangGraph stacks | Native LangChain |
| Braintrust | Eval tracking, scoring pipelines, dataset management | SDK |
| Helicone | Lightweight logging and cost tracking | Proxy / Gateway |
With structured traces in place, the next step is turning production failures into automated evals.
Build automated bias evals from benchmarks, counterfactual tests, and real incidents
Once tracing is set up, use those incident traces to build repeatable bias evals that run on every change.
Pick the right benchmark set for your pipeline
Public benchmarks are a good starting point. But they almost never cover the exact risks in your pipeline.
A hiring recommendation tool can fail in very different ways than a clinical support assistant or a loan application summarizer. That’s why it makes sense to start with public benchmarks, then layer in production-like prompts from your own workflows.
| Benchmark | Focus Area | Output Type | Strengths |
|---|---|---|---|
| StereoSet | Stereotypical bias in language models | Fill-in-the-blank | Measures associative bias at scale |
| CrowS-Pairs | Social biases in masked language models | Sentence pairs | Compares stereotypical vs. anti-stereotypical text |
Treat each benchmark like a reusable test set for prompt, model, and routing changes. They work well as regression cases, but they should not be your entire fairness test.
For U.S.-specific use cases like hiring, finance, or healthcare, add prompts you write yourself. A loan approval prompt that changes only the applicant’s implied ethnicity, or a clinical triage prompt that changes the patient’s age, can expose risks that public benchmarks may miss. From there, use counterfactual pairs to check whether the same task shifts across groups.
Write subgroup and counterfactual evals that expose uneven model behavior
Counterfactual testing keeps the task fixed, changes one demographic marker, and looks for output differences. The swaps that matter most will depend on your use case.
For a hiring tool, you might swap names tied to different ethnicities or genders. For a benefits eligibility tool, you might swap age markers. In each case, keep the prompt template, task, and routing path the same for both versions.
What you measure after the swap depends on the kind of output you have. For recommendation tasks, compare things like:
-
quality
-
length
-
outcome distributions across subgroups
For summarization, use BLEU, ROUGE-L, or cosine similarity between counterfactual output pairs to measure invariance. For open-ended generation, run outputs through a toxicity classifier like Detoxify or a sentiment model like VADER to catch shifts in tone or toxicity.
The key rule is simple: hold everything constant except the demographic marker. If anything else changes between the pair, you can’t pin the difference on bias. Score the pairs with automated checks first, then send only the borderline cases to review.
Automate scoring with classifiers and judge models
No single scorer works for every output type, so use a mix.
A practical setup looks like this:
-
Start with a toxicity or sentiment classifier for a first pass
-
Add a rubric-based LLM-as-judge for outputs that are harder to score with a plain classifier
-
Keep human review in the loop for edge cases and disputes
LLM judges miss too often to stand on their own. They’re useful, but only as one signal alongside classifiers and human review.
When your observability stack surfaces a bias incident, turn that trace into a regression test right away. In Latitude, turn each incident trace into a regression test. That way, your eval suite keeps growing based on the failure modes your system is actually hitting in production.
Use the same thresholds in pre-merge checks and release gates. Set hard CI thresholds for subgroup gaps, stereotype rates, and invariance scores so every model, prompt, or routing change runs against the same cases automatically.
Add bias checks to CI, canary releases, and production alerts
Evals only help if they stop bad changes from shipping. The point is simple: wire bias results into your release flow so regressions get caught before users see them, not after.
Set pre-deployment thresholds for prompts, models, and routing changes
Turn your thresholds into release gates. Run a small PR suite of about 80 cases on every pull request, then trigger a larger suite of about 700 cases only when prompts, models, or tool configs change. Path filters like dorny/paths-filter can keep expensive bias evals from running on unrelated changes.
Use the thresholds from the prior section in CI with both:
-
Absolute floors
-
Allowed drop from baseline
For example, toxicity should stay below 0.01 , while a subgroup fairness score should not fall by more than 2% from the main branch baseline. That baseline comparison matters. Looking at a raw score by itself can miss slow drift over time.
Also, pin your LLM judges to date-stamped versions such as gpt-4o-2024-08-06 instead of floating aliases. If the judge model changes without notice between runs, your past bias baselines stop lining up with current results.
Use canary and shadow traffic to compare subgroup outcomes before full rollout
CI catches known failures. Canary and shadow traffic catch subgroup drift in live conditions.
During a canary rollout, send a small slice of live traffic to the candidate model and compare per-cohort outcomes with the current production baseline. Use a stratified sample of recent production traffic instead of a frozen reference set so the eval reflects who your users are right now. A weekly slice of 5,000 samples is a reasonable target. Track output quality and performance by group side by side before you promote the new version.
Here’s how the three check types stack up:
| Check Type | Speed | Coverage | Operational Effort |
|---|---|---|---|
| CI-Time Checks | Fast (<10 min) | Golden set / Regressions | Low (Automated) |
| Canary/Shadow | Slower (hours to days) | Live-like traffic / Subgroups | Medium (Staged rollout) |
| Real-Time Alerts | Immediate | 100% Production traffic | High (On-call/Triage) |
Another signal worth watching is distribution shift. If the Population Stability Index (PSI) on production inputs goes above 0.25 since the last bias audit, rerun bias evals on the new input mix.
Set up alerts and incident workflows for bias regressions
Production monitoring fills the gaps that CI and canary checks leave behind. Set alerts for spikes in toxicity toward a given subgroup, growing score gaps between cohorts, or sudden shifts in refusal rates.
Per-cohort SLOs make those alerts concrete. For example: “helpfulness for non-English queries stays within 8% of the global rate.”
When an alert fires, use the same workflow each time. Start with triage using structured logs and trace IDs to isolate the affected cohort. Then do root-cause analysis by comparing regressed output with the baseline through side-by-side diffing. If the issue is confirmed, use feature flags or kill switches to roll back to a stable prompt version or model. After that, document who acted, when they acted, and what changed, then add the incident to the eval suite.
Latitude can surface failure modes and turn real incidents into new evals.
Feed confirmed incidents back into the eval suite.
Close the loop with mitigation, documentation, and continuous improvement
Match the mitigation method to the failure mode
Once you’ve confirmed an incident, the goal is simple: use the smallest fix that solves the problem.
That means matching the mitigation to the source of the failure. If the issue comes from the prompt, adjust the prompt. If it comes from retrieval in a RAG system, filter retrieval. If the model’s output is unsafe or toxic, add guardrails. And if the problem traces back to training data or the model itself, use rebalancing, fine-tuning, or adversarial debiasing. That includes cases like subgroup outcome gaps, counterfactual drift, and output toxicity.
| Mitigation Method | Implementation Complexity | Expected Impact on Bias |
|---|---|---|
| Prompt Engineering (neutralization, few-shot balancing) | Low | Moderate |
| Retrieval Filtering | Medium | High (for RAG pipelines) |
| Guardrails (output-level) | Medium | High for safety/toxicity |
| Data Rebalancing / Augmentation | High | High (addresses root cause) |
| Fine-tuning (regularization) | High | Moderate |
| Adversarial Debiasing | Very High | High (structural fix) |
| Post-processing (threshold adjustment) | Low | Moderate |
After that, rerun the same subgroup and counterfactual tests to check whether the change worked. A fix that helps one group can shift the gap to another, so don’t stop at the first good-looking result. Rerun your fairness scorecard across all tracked subgroups and metrics, then test 200–500 matched counterfactual pairs to confirm that the specific disparity is gone.
Use the four-fifths rule as a pass/fail check. If any subgroup’s quality rate is below 80% of the top-performing group, the fix isn’t done yet.
Every confirmed fix should go straight back into the eval suite and alert rules. If you had to fix it once, you’ll want to catch it faster next time.
Document metrics, incidents, and decisions for repeatable governance
Detection and mitigation only matter over time if you write them down.
Each bias incident should create a structured record. That record should include the system version and model hash, affected subgroups, root cause, what changed, who approved the change, and a before/after comparison of the metrics. That record then becomes part of future release decisions.
If disparities remain after mitigation, log those too. Include a written reason for accepting them, especially in regulated or high-risk systems.
Store audit records in version-controlled, append-only storage. Also document why you picked one fairness metric instead of another, plus any per-cohort SLO approvals and budget waivers tied to metric breaches.
Platforms like Latitude can help here by tracking failure modes as persistent issues and auto-generating evals from confirmed incidents.
Conclusion: A practical workflow for continuous bias detection
Bias detection in LLM pipelines is an engineering discipline, not a one-time review.
The workflow is a closed loop: detect failures with instrumented traces and automated evals, test each change against subgroup and counterfactual cases, apply the smallest fix that works, document every incident and decision, and then re-check the system before the next release to make sure the fix still holds.
FAQs
What bias metrics should we track first?
Start with metrics that match your use case, not one big roll-up number.
For decision-making pipelines, track disparate impact. This metric flags cases where outcome rates for a demographic group drop below 80% of the highest-performing group.
For classification tasks, put equal opportunity near the top of your list so recall stays consistent across populations. Use statistical parity to check whether outputs are distributed equally. Latitude can automate these checks and help track regressions.
How do we test bias without storing PII?
Use synthetic demographic profiles and counterfactual prompt perturbations instead of real user data. In plain terms, build test prompts with swapped demographic details rather than pulling from actual people.
You can substitute protected attributes in your prompt corpus, such as:
-
names
-
pronouns
-
age descriptors
The key is to keep the prompt structure the same and change ONLY the demographic variable. That lets you measure output differences without processing or storing actual user information.
Tools like Latitude can help track these evaluations and surface failure modes.
When should a release be blocked for bias?
Block a release when bias testing shows the model falls short of preset performance or fairness thresholds. One common benchmark is the four-fifths rule : if any demographic group’s outcome rate is below 80% of the highest-performing group, the release should stop.
The same goes for disparate-impact regressions , sudden spikes in toxicity, or behavior that shifts across demographic variants in counterfactual testing. These are red flags, not edge cases.
Latitude can help spot these regressions and generate evaluations from production issues, which makes it easier to catch problems before they ship.